
SI Cloud Control (SICC)
This guide will show how to use the ServingIntel Cloud Control platform. Run through the steps below to get started!
Overview
ServingIntel Cloud Control is a cloud-based platform that provides a complete solution for Sales Item Management, Loyalty Management and Team Member Management.
Pre-Requisites
Before using this guide, the following should be met first:
1) Any of the following roles should be granted to the user or fulfilled first before using ServingIntel Cloud Control:
a. Store Admin
b. Store User
2) Login credentials are given.
3) The following system applications and requirements are installed:
Managed by ServingIntel Cloud Control Team
This Topic Includes:
SICC Reporting
- Dashboard Reports
- Daily Performance Report
- Transaction Detail Report
- Transaction Report
- Customer Account Statements
- Gift Card Liability Report
- Item Sales Report
- Meals Sold Report
- Tip Handling Report (Tips Report)
- Time Clock Report
- Audit Report for Cancelled Sales, Voids, Comps, Discounts
- Resident Attendance Dashboard
- Resident Attendance Report
SICC Items Management
- Add Items
- Delete Items
- Update Item Images
- Update Web Item Names
- Update Items from SICC to eCommerce
- Enable/Disable Items from SICC to Hospitality Site
- Display “Available/Not Available” Items from SICC to Hospitality Site
- Update Item Availability
- Sort Items on the eCommerce Site from SICC
- Add Inscriptions for Items
- Update Item Attributes
- Set Up Item Scheduling
- Enable Meal Points
Using Group Edit Functions
Meal Plan Management
- Configuring Meal Plans
- Managing Meal Plans
- Configuring Meal Types
- Sorting Meal Types
- Meal Plan Points/Count Improvement
Site Settings Management
- Enable/Disable eCommerce
- Set Up eConnect Settings
- Set Up Order Times
- Add Item Groups
- Manage Meal Cycles
- Update Meal Cycles
- Create Meal Cycles
- Manage the Order Now Introductory Message
- Blocked Users
- Set Up Menu Names
- Add New Categories
- Delete Menu Names
- Manage eCommerce Sales Categories
- Set Up Business Hours
- Configure Settings
- Configure Devices
- Set Up a Virtual Restaurant
- Set Up Revenue Centers
- Set Up Service Profile Table Layouts
- Update Table Layouts
- Add Gift Cards
- Add Gift Card Types
- Check Security Level Settings in Discount Management and Employee Maintenance
- Enable a New Job Code
- Update POS Type on Service Profile
- Block User Sites Assignment
- Setting Up Payment Types
- Store ID Integration
- Merging User Logins & Employee
- Security Levels for 360
- 360 Devices and Printer Settings
- Delivery Zone Set Up
- Discount Management
- Add Order Type
- New Company Details
- Add eConnect Price
- Auto Gratuity – Additional Changes
- SI 360 Menu Controls
AI, BI, and SI Integration
Set Up Service Profile Table Layouts
#strategic
Managed by ServingIntel Cloud Control Team
Date Published: February 23, 2024
Date Updated: January 13, 2026
Version: 2025.4.6
1. Go to the Profile section and choose “Site Settings.”
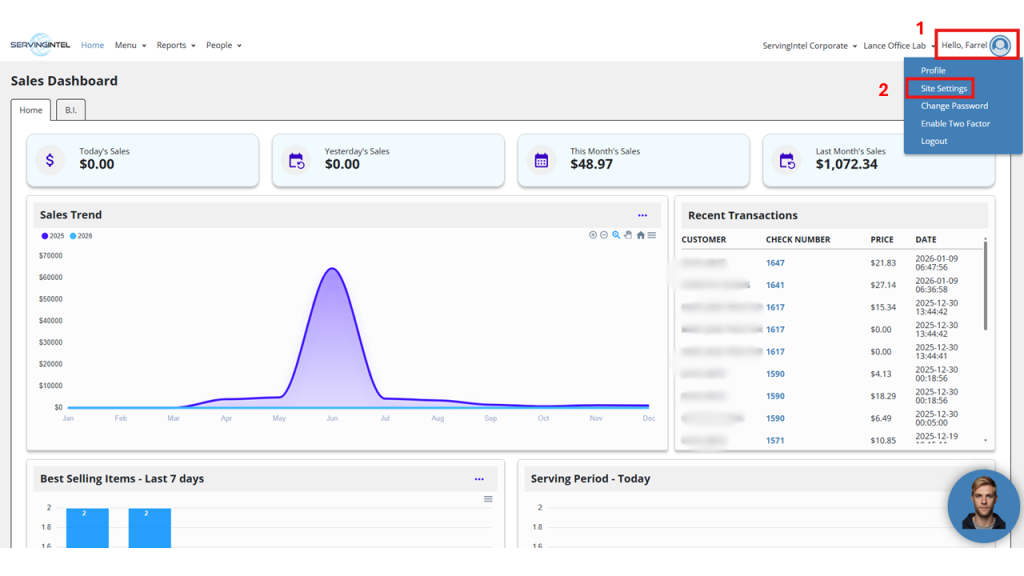
2. Scroll down to System Settings and click on “Table Layout.”

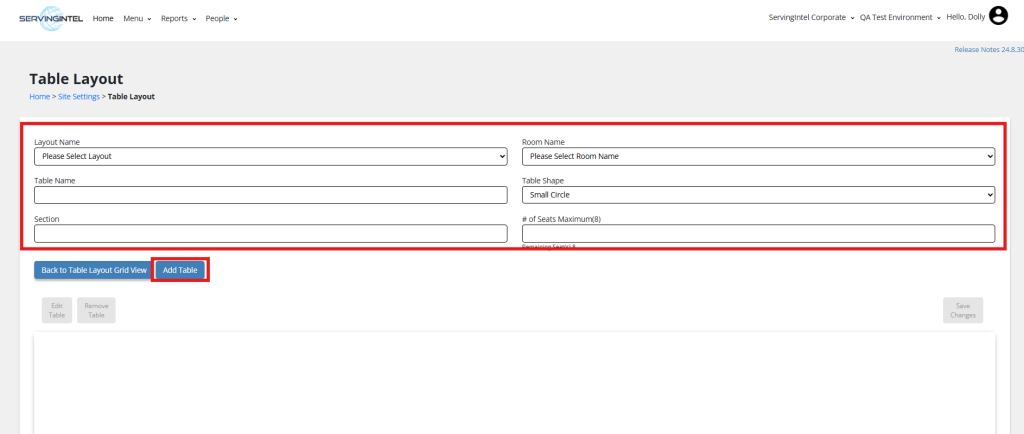
3. Fill in the following details:
- Room Name: Designation of the room where the table is located.
- Table Name: Identifier for a specific table within the room.
- Table Shape: Physical configuration of the table (e.g., round, rectangular).
- Section: Defined area within the room that includes multiple tables.
- Number of Seats: Total capacity of seats available at the table.
Then, click the “Add table” button to continue.

4. Click “Add Table Layout” to create a new data entry.
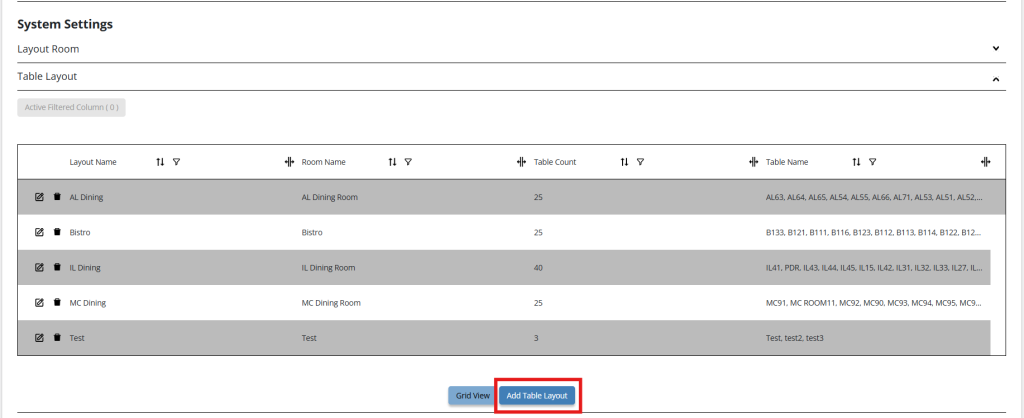
Fill out the necessary details:
- Layout Name: The name given to a specific table layout for easy identification.
- Room Name: The name of the room where the table layout is located.
- Table Name: The identifier or label assigned to a specific table within the layout.
- Table Shape: The shape of the table (e.g., round, square, rectangular).
- # of Seats: The number of seats available at the table.
- Section: The designated area or zone within the room where the table is placed.
After, click Add Table. You can now review it, make adjustments, and save the layout or add more tables as needed.
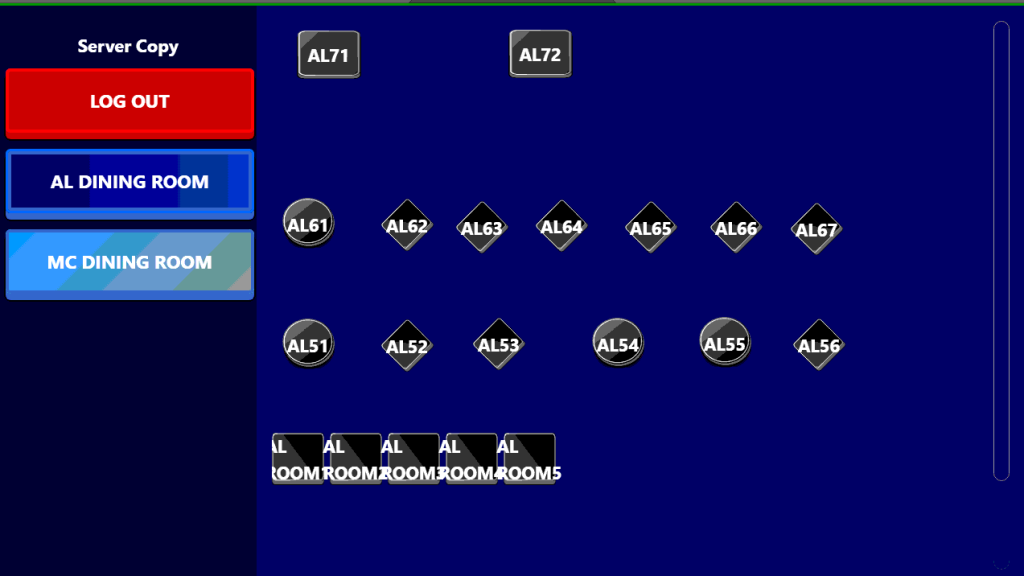
Here is the result in SI360 after completing the table layout in SIC configuration:
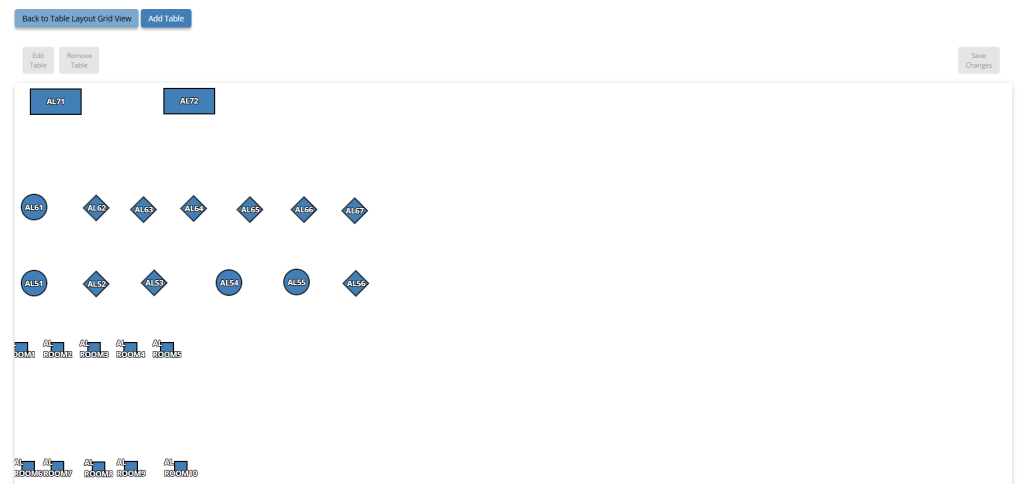
This is how the layout looks in SIC:
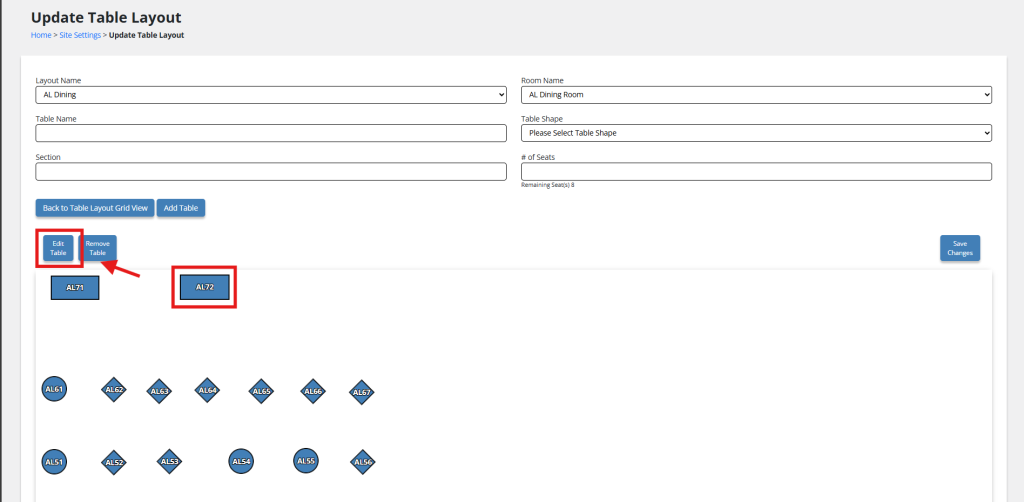
Now, editing a newly built table layout is pretty much straightforward. Here’s how:
1. Update the table layout anytime by clicking a table of your choice and hit Edit Table.
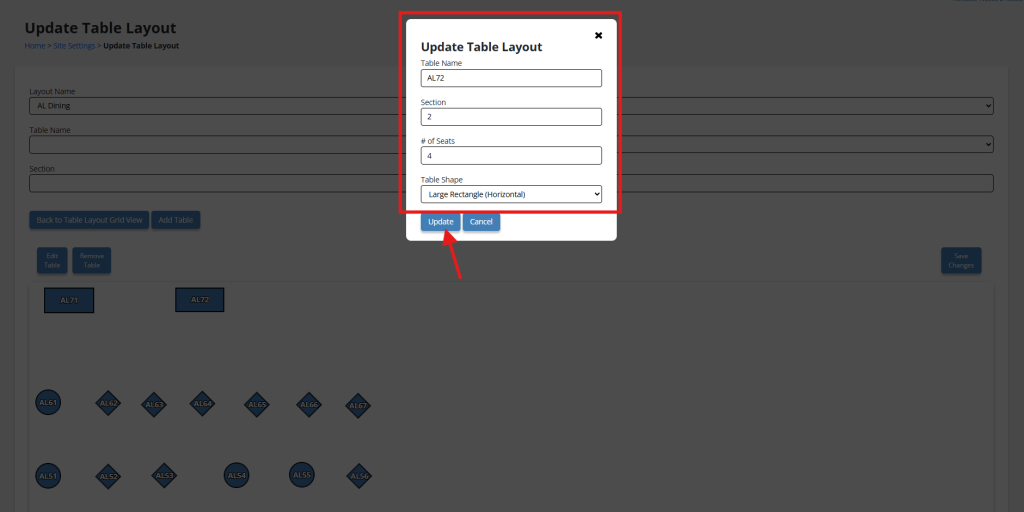
2. Click Update to save the changes.
With the recent update, several improvements have been introduced to enhance your experience:
- Table Labels:
Table names are now shortened to fit better in the layout. Names longer than 5 characters will display only the first 2 and last 2 letters, with “…” in the middle (e.g., “NewLong TableName01” becomes “Ne…01”). Hover over the name to see the full details.
- Editing Information:
Click the “Edit Table” button to view full details or make changes easily.
- Saving Optimizations:
Only tables that are moved or edited will be saved. Previously, all data was saved, even if unchanged, leading to longer loading times. This update speeds up the process and improves efficiency.

Ready to Learn More?
See how our innovative dining solutions can help elevate the resident experience and improve operational efficiencies.