
SI Cloud Control (SICC)
This guide will show how to use the ServingIntel Cloud Control platform. Run through the steps below to get started!
Overview
ServingIntel Cloud Control is a cloud-based platform that provides a complete solution for Sales Item Management, Loyalty Management and Team Member Management.
Pre-Requisites
Before using this guide, the following should be met first:
1) Any of the following roles should be granted to the user or fulfilled first before using ServingIntel Cloud Control:
a. Store Admin
b. Store User
2) Login credentials are given.
3) The following system applications and requirements are installed:
Managed by ServingIntel Cloud Control Team
This Topic Includes:
Establishing the ServingIntel Cloud Control Platform
ServingIntel Cloud Control Navigation
- How to Register Account in ServingIntel Cloud Control
- How to Login
- Parts of the ServingIntel Cloud Control Homepage
- Viewing Different Branches to Locations
- Viewing, Searching and Editing Items
- How to View Labor VS Sales from HOMEPAGE Dashboard (Current Date)
- How to View Previous Date’s Sales from HOMEPAGE Dashboard
- How to View Customers
ServingIntel Cloud Control Reporting
- How to View Daily Meal Sales Report
- How to View Sales and Cost Report
- How to View Daily Performance Report
- How to View Transaction Report
- Checking Transaction Detail Report
Item Management in ServingIntel Cloud Control
- How to Add Items on ServingIntel Cloud Control
- How to Delete Items on ServingIntel Cloud Control
- How to Create Modifiers
- How To Update Modifiers
- How To Update Item Image
- How to Update Web Item Name
- How to Update Item from ServingIntel Cloud Control to eCommerce
- How to Update Item from Future Point of Sale to ServingIntel Cloud Control Price and Other Information
- How to Enable/Disable items from ServingIntel Cloud Control to Hospitality Site
- How to Display “Available/Not Available” items from ServingIntel Cloud Control to Hospitality Site
- How to Update Item Availability
- How to Sort items in eCommerce Site from ServingIntel Cloud Control
- How to Put Inscriptions for Items in ServingIntel Cloud Control
- How to Update Item Attributes
- How to Setup Item Scheduling
Managing Resident Meal Plans
Managing Items in ServingIntel Cloud Control
- How to Turn On/Off eCommerce in Site Settings
- How to Setup eConnect Settings in Site Settings
- How to Setup Order Time in Site Settings
- How to Add Item Group
- How to Manage Meal Cycle in Site Settings
- How to Update Meal Cycle in Site Settings
- How to Manage Meal Plan Definition in Site Settings
- How to Manage Order Now Introductory Message in Site Settings
- How to View Block User in Site Settings
- How to Setup Menu Names in Site Settings
- How to Add New Category
- How to Delete Menu Name
- How to Manage eCommerce Sales Category in ServingIntel Cloud Control
- How to Setup Business Hours in Site Settings
- How to Setup Configuration in Site Settings
- How to Setup Configuration Device in Site Settings
- How to Setup Virtual Restaurant in Site Settings
- How to Revenue Center in Site Settings
- How to Setup Sales Tax in Site Settings
- Updating People Information
- Adding VDU ID Using Group Edit
Managing eCommerce Sales Categories in ServingIntel Cloud Control
Managed by ServingIntel Cloud Control Team
#strategic
Date Published: February 10, 2022
Date Updated: May 24, 2024
Version: 2.0
1. In ServingIntel Cloud Control, navigate to Menu > Menu Item Information.
2. Choose an item from the table, and then click the Edit button in the action column.

3. Move to the General tab. Update the Web Item Name, then click the Update Menu Item button to apply the changes.

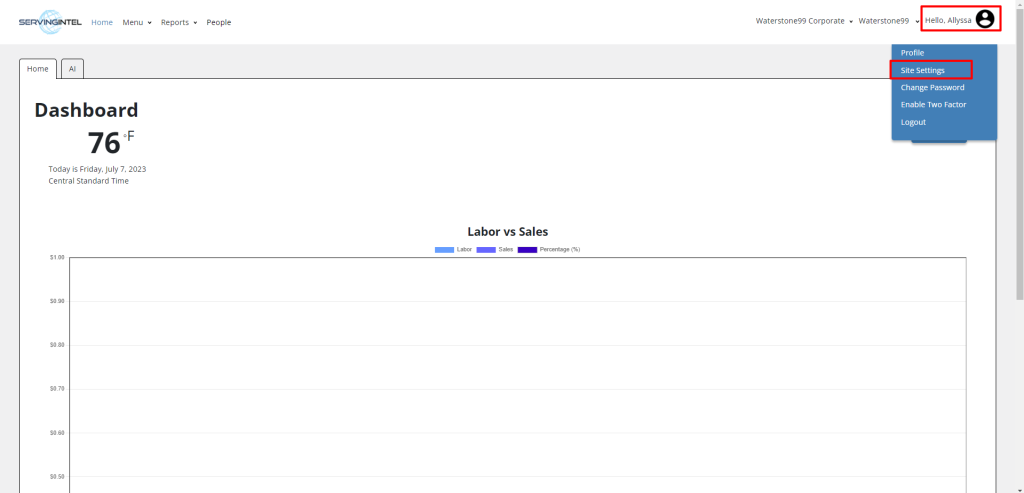
1. Access the Servingintel Cloud Control dashboard and navigate to “Profile” > “Site Settings.”
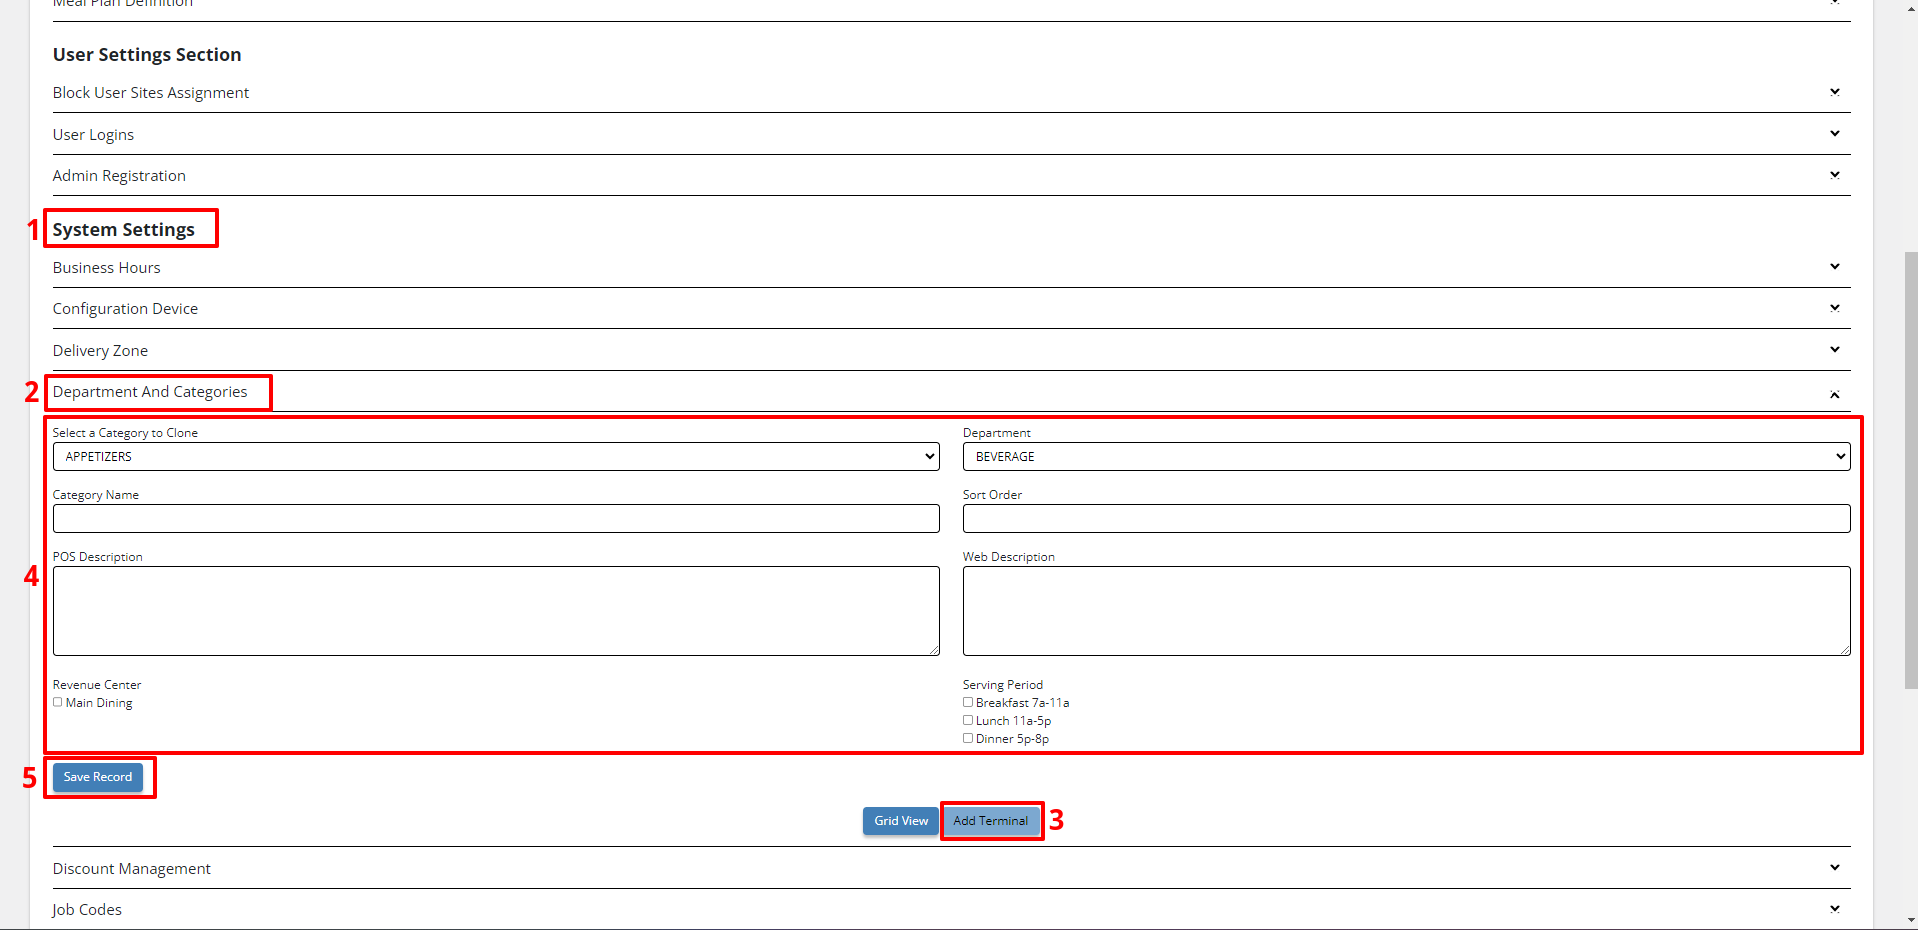
2. Click on the gear icon located at the upper-right corner of the page. Then, select “Site Settings” to access additional settings.
3. Scroll down to the “System Settings” section and choose “Department and Categories.”
4. Click on the “Add Terminal” button.
5. Utilize the dropdown menu to select a category for cloning.
6. Use the dropdown menu to select a department.
7. Enter a name for the category.
8. Specify a number for the sorting order.
9. Provide a description for POS (Point of Sale).
10. Provide a description for the web interface.
11. Check the box if it’s applicable for the Main Dining Revenue Center.
12. Tick the box and select the serving period.
13. To finalize, click the “Save Record” button to save the changes.
Ready to Learn More?
See how our innovative dining solutions can help elevate the resident experience and improve operational efficiencies.