triPOS® Direct Installation Guide
Overview
This document provides technical details on triPOS® Direct installation procedures and offers best practices for POS developers. It is intended for ISVs who have completed triPOS Direct certification and are developing their own POS-specific implementation documentation.
Version 7.0.0
Release Date: June 16, 2023
New Features & Improvements
- Support for Ingenico Tetra devices with firmware version UPP 7.83.31.
- Added support for Ingenico Lane 3600 and Self 4000.
- Configurable prompt to remove card at the beginning of the transaction.
- Configurable prompts for confirming surcharge and total amounts.
- Tip prompt is now before card input to comply with card brand requirements.
- Support for Cashback with Contactless EMV debit transactions.
- All installed files are signed.
- Ended support for PCI 4 devices.
Bug Fixes & Other Changes
- Improved handling of generic exceptions during disconnection (store and forward).
- Fixed ‘card removed’ prompt issue on P2PE Validated and Canadian devices with firmware UPP 6.81.08.
Discontinued Features
- Support for PCI 4 certified devices discontinued.
- No support for Ingenico Telium (iPP320, iPP350, iSC250, iSC480, iSMP4, iUC285) and Verifone Mx (Mx915, Mx925) and Ux (UX300, UX400, UX100) device families.
- Customers can continue using older versions or upgrade to Ingenico Tetra devices (Lane 3600, Link 2500, Lane 7000, Lane 8000, Self 4000).
Supported Operating Systems
- Windows 8.1 Pro and Enterprise (32 and 64 bit)
- Windows 10 Pro and Enterprise (32 and 64 bit)
- Windows 11 Pro (64 bit)
- Linux CentOS Rel 7 (64 bit)
Note: Variations of the operating system edition name are not supported.
EMV Certified Devices
- Worldpay
- EMV Contact/Contactless/QuickChip for Ingenico Lane 3000, 5000, 7000, 8000, Link 2500, Move 5000
- NEW EMV Contact/Contactless/QuickChip for Ingenico Self 4000 and Lane 3600
Fiserv
- EMV Contact/Contactless/QuickChip for Ingenico Lane 3000, 5000, 7000, 8000, Link 2500, Move 5000
Paymentech
- EMV Contact/Contactless/QuickChip for Ingenico Lane 3000, 5000, 7000, 8000, Link 2500, Move 5000
Global Payments
- No supported EMV Contact/Contactless devices
TSYS
- No supported EMV Contact/Contactless devices
Known Issues
- After firmware updates during installation, Ingenico Tetra devices configured with DHCP may lose connectivity if their IP address changes. Devices with static IP are not affected.
- Canadian devices may display duplicate screens, such as “Card Read Cancelled” before “Cancelled”, when a transaction is cancelled by the cardholder.
These updates enhance functionality, address issues, and expand compatibility with supported operating systems and EMV-certified devices.
About the triPOS developer engine.
1. Recommended triPOS Direct Installation Options
There are two options to incorporate the triPOS installation into your POS Install:
- Silent Install/Command-line: package the triPOS installation with your software installation processes for a consistent and streamlined install. We highly recommended running the installer from the command-line.
- Setup Wizard: the triPOS Setup.exe enables the triPOS installation with screen prompts for insertion of initial triPOS configuration details.
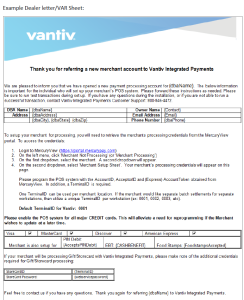
2. Configuration Settings: Dealer Letter and Merchant Setup Sheet
When your merchant account is enrolled with Vantiv, you will receive a Dealer Letter containing your merchant account details. Follow steps 1-4 in the example letter to access your merchant credentials. Use this information to configure the merchant settings.

3. Default triPOS Location, Authentication, Settings, and Configurations
The following details the default settings and configuration found within the triPOS.config file. It’s important to note these defaults and any alterations made programmatically during or after installation.
1. Default triPOS.config location:
- 32-bit: C:\Program Files\Vantiv\triPOS Service\triPOS.config
- 64-bit: C:\Program Files (x86)\Vantiv\triPOS Service\triPOS.config
2. developerKey and developerSecret:
- During installation, two entries are generated for developerKey and developerSecret to authenticate requests sent to triPOS.
- These credentials remain valid indefinitely and do not expire.
- It’s advisable to assign a unique GUID as the value for developerKey to ensure uniqueness within the configuration file.
- developerKey: This key is included in the header of each request to triPOS.
- developerSecret: This secret is used to sign each request sent to triPOS.
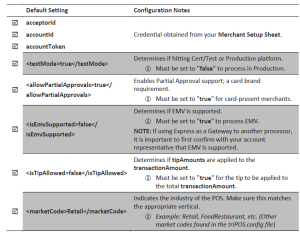
3. Default Settings/Configurations:
- Carefully review all settings within the config file to optimize the cardholder experience and streamline transaction processing in your POS system.
Check and confirm these key settings:
4. Device Setup: USB or IP
These instructions detail how to configure your merchant’s peripheral device in the triPOS.config file. To programmatically modify settings, utilize the documented endpoints available at http://localhost:{listening port}/api/help on the machine hosting triPOS. Replace {listening port} with your assigned port (default is 8080). Once the device(s) are configured correctly in the triPOS.config file, restart the service on the local machine where triPOS is installed to apply the changes.
Note: In this document, “device” refers to your peripheral PIN pad hardware. References to “terminal” and “Terminal ID” in the triPOS.config file and other triPOS documentation denote the lane or workstation where triPOS is installed.
Note: Review our sample configurations for USB and IP lanes in the local triPOS.config. These configurations are denoted by commented-out lines “< – -“ within the lane section.
Specific Setup for USB Devices
- Download and distribute the appropriate EMV device driver with your application or host it on your own site. (Device drivers are available on our MFT product download page where you initially accessed the SDK.)
- Install the device driver.
- Validate the COM port by navigating to Windows Control Panel > Hardware and Sound > View Devices and Printers.
- Update the triPOS.config file with the appropriate <comPort>.
- Ensure the dataBits, parity, stopBits, and baudRate settings in the triPOS.config file match the Port Settings in Device Manager:
- Start > Device Manager > Ports > (Select Device) > Right Click > Properties > Port Settings.
Specific Setup for IP Address Devices
- Obtain the device IP address.
- Update the triPOS.config file with the appropriate IP Address and IP Port:
- ipAddress: The IP address where the triPOS service is located; most installs will use 0.0.1.
- ipPort: The IP port used by the EMV device; most installs will use 9001.
5. Validate Lane/Device Configurations
To ensure proper setup for each terminal using a triPOS device, follow these configurations:
- Lane ID: Assign a unique Lane ID to each terminal. This ID identifies the terminal for EMV transactions.
- For example: Terminal 1 uses Lane ID 1, Terminal 2 uses Lane ID 2.
- Terminal ID: Use the Terminal ID, which matches the Merchant number provided during account boarding. It must be consistent across devices to avoid separate batch processing.
- For instance: Terminal 1 and Terminal 2 both use terminalId 0001.
- Driver: Select the correct driver based on the device:
- VeriFoneFormAgentXpi: VeriFone Mx915/Mx925
- VeriFoneXpi: VeriFone Vx805
- VeriFoneCXpi: VeriFone Vx805, Vx690 (CXPI)
- IngenicoRba: Ingenico Devices
- Description: Use the Description configuration to label the specific workstation or device, such as “Bar1” or “Front register”.
- Idle Screen: Set the <message> or <image> for the device’s idle display.
Note: <image> is currently supported only with VeriFone Mx devices.
6. Validate triPOS is Ready!
To ensure triPOS is successfully installed:
- Check Installation via Browser:
- Open your browser and go to http://localhost:{listening port}/api/help on the workstation where triPOS is installed.
- If triPOS is installed correctly, you will see the version information, along with access to the Swagger documentation and release notes. (Replace {listening port} with the specific port assigned, typically 8080.)
- Validate Service in Windows:
- Open Windows Services and ensure that the triPOS.NET service is running.
triPOS Installation Configuration Checklist:
✅ Ensure the Correct OS
-
- Windows 7 (Professional/Enterprise – 32/64 bit)
- Windows 8.1 (Professional/Enterprise – 32/64 bit)
- Windows 10 (Professional/Enterprise – 32/64 bit)
✅ Open Listening Port (default = 8080)
-
- Allow IP ranges on Port 443:
- 120.156.1 to 74.120.156.254
- 120.157.1 to 74.120.157.254
- 120.158.1 to 74.120.158.254
- 120.159.1 to 74.120.159.254
- Allow IP ranges on Port 443:
✅ Check COMMTYPE on Reboot
-
- USB: COMMTYPE: USB
- IP: COMMTYPE: TCPIP`
✅ Match COMM Values on Reboot
-
- USB: ComPort in Device Manager = COM value in triPOS.confi
- IP: Device IP Address = IP Address in triPOS.config
✅ Check Anti-Virus
-
- Ensure it isn’t blocking by viewing the Anti-Virus logs.
✅ Contact Tech Support
-
- Call 866.435.3636 and have the following:
- Verbose log
- config file
- Call 866.435.3636 and have the following:
Appendix: Install Methods
Silent Install using the Command-Line
- You can install triPOS silently through the command-line. Below is a sample command:
Notes
- /q: Runs the installer silently without displaying any UI components.
- USERCOMPANY: Specifies the company name to be displayed on the PIN pad’s welcome message.
- INSTALLFOLDER: An optional argument to set the installation folder path for triPOS.
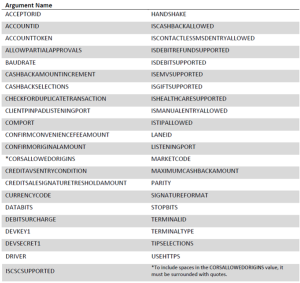
The triPOS.config values can be set through command-line arguments during a silent install. Details and descriptions of these arguments are available in the DOC-1360.
Install Using the triPOS Setup Wizard
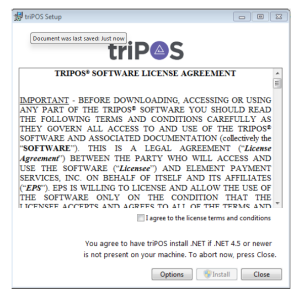
- The triPOS installer is included in the triPOS SDK.zip file. To start the setup wizard, double-click on triPOS Setup.exe.
- The first screen you will see is the TRIPOS® SOFTWARE LICENSE AGREEMENT.
- To select a custom installation directory, click “Options” and enter the desired location. The default installation paths are:
- 64-bit machine: C:\Program Files (x86)\Vantiv\TriPOS Service
- 32-bit machine: C:\Program Files\Vantiv\TriPOS Service
- Review the End User License Agreement, agree to the terms and conditions, then click “Install.”
- The next screen is Configuration Information:
- Enter your Express credentials. All fields are required to continue with the installation.
- These credentials can be edited later by manually editing the triPOS.config file in Admin mode.
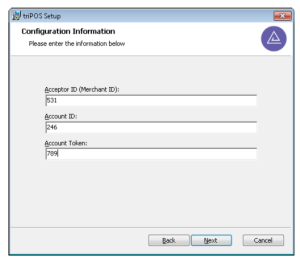
Note: For a list of each field, see the table of arguments under Silent Install in the previous section or review the full argument descriptions in the triPOS Configuration section of the triPOS Integration Guide on Vantiv O.N.E.: DOC-1360.
- Click “Next” to proceed to the “Completed the triPOS Setup Wizard” screen.
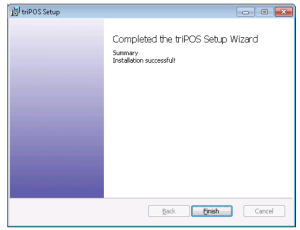
- Click “Finish” to proceed to the “Setup Successful”
Preserving triPOS.config Settings When Updating Versions
The triPOS.config file contains Express credentials, lane configurations, and transaction settings. After the initial installation, you can customize individual merchant settings or establish a custom configuration to be used across multiple merchants and versions. To preserve these settings when updating to a newer version, triPOS automatically creates a backup configuration file. Starting from version 5.3.0, the installer can locate and use the most recent backup to generate a new triPOS.config file, retaining your previous custom settings along with any new triPOS configurations.
Note: It’s always recommended to create a backup of the triPOS.config file regardless of the installer’s capabilities. This ensures that your settings are saved in case of any errors or unexpected changes.
Preservation Logic for triPOS.config Backup
To ensure the preservation of the most recent backup of the triPOS.config file, the installer follows this logic:
- It first reviews the registry to locate the directory of the previous version.
- Next, it attempts to find all backup files named “triPOS.config.2”.
- If multiple backup files are found, the installer selects the most recently created backup for use during the upgrade process.
- If no previous installation path is found in the registry, or if that directory does not contain any backups, the installer checks the current installation directory for backups.
- Upon finding a backup file, the installer preserves its contents before proceeding to finalize the new triPOS.config.
- If no backup file is found, or if the located backup does not contain a supported version node, the installer continues to finalize the new triPOS.config without utilizing a backup.
Finalizing the triPOS.config Backup
Once the backup config file is identified, the installer proceeds with processing the command-line arguments provided during the installation or upgrade:
- Command-line arguments take precedence over preserved settings and are directly mapped into the triPOS.config. For instance, if the resulting triPOS.config initially sets “allowPartialApprovals” to “true,” and the upgrade command-line argument “ALLOWPARTIALAPPROVALS=false” is passed, the final value in the new triPOS.config will be false.
- Command-line arguments map to parallel configuration values in the triPOS.config file, with exceptions for the developer and lanes sections:
- The developer section in the triPOS.config file can contain multiple sets of developer credentials, but the installer only allows one set of developer key and secret to be passed during installation or upgrade. Additional developer credentials must be manually added to the triPOS.config file and cannot be included in command-line arguments.
- Similarly, the lanes section in the triPOS.config may include multiple serial and IP lanes. The installer permits only one set of serial lane settings to be passed via command-line arguments:
- If one or more lane settings are not null, the installer consolidates all lane argument values into a single serial lane, referred to here as the installer lane.
- If the LANEID of the installer lane is present in the triPOS.config file, the installer replaces the existing lane settings with the installer lane. Empty values in the installer lane are written as empty in the file.
- If the LANEID of the installer lane is not found or is empty in the file, the installer inserts the entire installer lane as a new serial lane in the triPOS.config file.
Note: The installer does not validate command-line arguments during install or upgrade. If arguments contain errors or misconfigured lanes, triPOS may fail to start, causing installation or upgrade failures. Test command-line arguments thoroughly in a controlled environment before using them in production to ensure a smooth process and avoid potential issues.
Logging the Install Process
It’s recommended to run the installer from the command-line (either in silent mode or manually) to take advantage of the logging features. To capture the logs, use the following command to launch the installer:
- Type “triPOS Setup.exe” –l log.txt into the command-line.
- The -l (lowercase L) argument specifies that the logs should be written to the file you identify, in this case, txt.
To install silently, add the /q argument as shown below:
- Type “triPOS Setup.exe” /q –l log.txt into the command-line.
In both cases, this command will produce two log files:
- txt (or the name you provided) – This file contains the logs of the initial setup program that starts the .msi installer.
- txt – This file contains most of the installer’s logs, showing the detailed steps and actions taken during the installation or upgrade.